Showing posts with label crafts. Show all posts

Monday, February 9, 2009

Dyeing, Spinning and Knitting!

I'm hopelessly cheap...errrr, I mean frugal. However, I do love beautiful sock yarn. If you aren't a sock knitter, you probably can't understand why anyone would pay $20 plus for a skein of hand-dyed sock yarn that will make one pair of socks when you could just go out and buy a whole finished pair of socks for a couple of bucks. Well, I can only say that if you knitted socks, you would understand.

I knit fairly quickly, so I am always on the lookout for good deals. Recently, I schemed up the idea to spin and dye my own sock yarn. There were two hurdles to overcome here. First of all, I wasn't aware you could purchase superwash fibre with nylon to spin. (This is the kind of yarn I like for my socks because it is washable and durable.) Second, I didn't actually have any clue how to spin.

I came across The Black Lamb and a super-amazing deal on mill-ends roving that was superwash with nylon! I was thrilled and ordered some right away. It actually arrived the next day! Woo hoo! Hurdle number one solved.

Hurdle number two, the part about my not knowing how to spin, was to be solved at my mom's. My mom is an accomplished spinner, having spun the fleece from their own sheep and made sweaters and lots of other wonderful handmade items for years. Although my first spinning lesson went well, it was evident that I was not going to be whipping up skeins and skeins of sock yarn in the next short while. So, my mom saved me. :) She spun up some of the roving into lovely yarn without my even asking. Thanks, Mom!
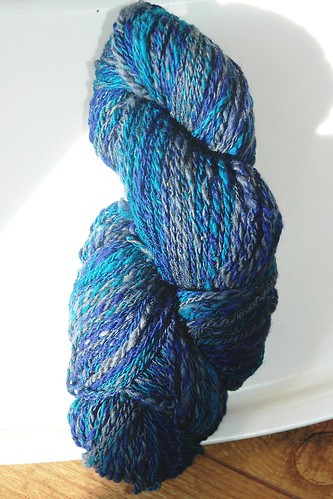


I decided that the first pair should go to my mom, seeing as she did so much work. I started a pattern called, Betty Cable Socks. (This is a Ravelry download, so you must be a member there to get it.) It does have errors, so I wouldn't run out and download it if you are not at least a little experienced in sock knitting. If you are, you should be able to easily spot the errors and correct them. I am also not sure about the effect of reversing the cables as I go up the leg. You can see the 'loops' in the picture, near the working ends of the socks.


Well, I'm off to homeschool skating with the kids. It is a beautiful, sunny day outside, as it was yesterday. It is such a good feeling when you know Spring will be arriving in the near future. :)

Tuesday, January 13, 2009

Sewing + Knitting = Sewing for my Knitting!


What could be better?!

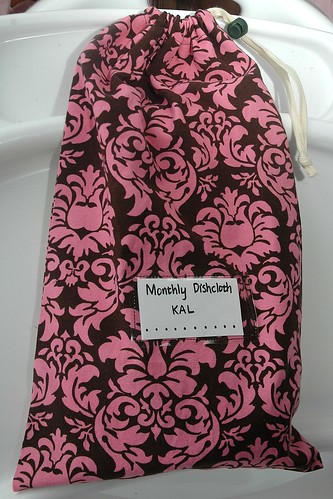
I made a few of these bags to keep my WIPs (works-in-progress) organized. It makes it easy to toss a project into a bag and also easy to leave a project lying around without my baby terrorizing it. However, this bag would work for anytime you'd like to be able to quickly identify or label the contents inside.

This is simply a basic drawstring bag with a toggle and a clear window. I was too lazy and cheap to go to the fabric store for some vinyl for the window, so I started scrounging around the house to find something suitable. I came across a clear zipper bag that our sofa cover came in. I found that it had a totally unnecessary pocket inside, so I cut it out. (Actually, I ripped it because, again, I was too lazy to go get the scissors.) It was enough to make about a half dozen little identification windows.

I cut a piece of the vinyl about 2 x 3"...

Interruption: OH MY GOSH! You should see how much my sweet little baby is walking right this very minute!! Very exciting. I knew he was advanced. ;)

...and then I turned one short edge under just a little and topstitched. After that, all that was necessary was to topstitch the remaining three sides to the bag where I wanted the I.D. pocket to go. It was a cinch.

Sunday, January 4, 2009

Stylin' in the Kitchen

I don't always post pictures of my crafts because:
  1. sometimes it is embarrassing how many I do
  2. this isn't specifically a crafty blog and non-crafters might get bored
However, I thought everyone might appreciate this lovely apron. I bought this pattern 10 months ago, just before my youngest baby was born. I thought I'd make it before his birth, but I just managed to get to it yesterday. I also made my sister an apron for her birthday earlier in December and I 'winged' one inspired by the pattern for my 7 year old daughter for Christmas.

The pattern is called, Emmeline published by SewLiberated. I really like it because it is so non-aprony and will actually make me feel dressed up a bit when I am just wearing my regular stay-at-home clothes. Shallow or not, I find that looking nice always raises my spirits a little. :)

Here is my new apron!


And, it is reversible!! This is actually my favourite side.


This is the one I made for my daughter for Christmas. She is such a lovely, willing helper in the kitchen that I thought it would be fun if we could match. She says I can wear the pink side of mine when we are working together and the other side when I am working alone. :)


Do you have a favourite apron? I'd love to hear about it, if you do!

Monday, December 22, 2008

Can you take more sock knitting pictures?

Because I have to have someone to share them with!

Here are some socks I did for my five-year-old. I did them with Cascade Fixation, which for those of you who don't know, is a cotton yarn with some elastic in it. I thought I was a wool-only girl, but I just loved this yarn for kids socks. They are probably the best-fitting socks I've ever made. I did them toe-up in a basic 2 x 2 rib with a picot bind off.


Here are Steve's boring work socks all finished. They turned out well - fit great, feel nice and look good. These were a 3 x 1 rib (finished in 1 x 1 rib for 1 1/2 inches or so). I used this pattern, which is my new go-to sock pattern. Sigh. Why don't guys like lace? I am the model in this pic, so the socks don't fit as snugly as they do on Steve.


And, some Basic Dude Socks I made for my dad for Christmas. I don't think he reads my blog. I'll have to warn my mom not to read this when my dad is in the room! These socks are made with worsted weight yarn (actually, three strands of sock yarn twisted together). They knit up VERY fast. I could get used to this! Again, I'm the sock model here, so they look baggier than they will be on my Dad.


And, that's it for finished objects. I've cast on some little socks for my baby for Christmas, which I think will also work up quickly, seeing as his little feet aren't very big.


Well, I'm off to knit!

Tuesday, December 9, 2008

Why I Haven't Been Blogging too Much Lately

I am hopelessly enjoying sock knitting!

I finished a pair of socks for my 5yo daughter. I'll post a picture another day...one of the socks is in the wash!

I finished a gorgeous pair of Baudelaire socks for me. True Love.


I am busy working on a pair of boring work socks for Steve. Fortunately, they are made with a lovely wool/silk blend. Unfortunately, the most exciting thing that happens is that I purl every 4th stitch.


Well, I'd better run. Baby is under the weather and there is the matter of the socks needing knitting. ;)

Thursday, November 6, 2008

Holiday Homemaking Freebies

Woohoo!! Joyous Home is putting together a terrific-sounding treat for us that they are calling: "12 Days of Holiday Homemaking", reminiscent of their wonderful magazine, Seasons at Home. Each of the 12 days will include freebies, such as: Holiday sewing, giving a Holiday tea, Holiday menu ideas, sweet treat ideas, Holiday bread making, traditions and more.

They are not requiring newsletter sign up or anything. It is just a gift to visitors. I really love Seasons at Home magazine, so I hope you will enjoy these free days! I can't wait to see them. :)

Tuesday, November 4, 2008

A perfect birthday season craft

Do you have a season where most or many of the birthdays are concentrated in your family? We do! Many of the birthdays in our family (immediate and extended) occur in September/October and December. Earlier this school year, we did a short unit study (Charlotte Mason style) on pioneers and the candle-dipping craft fit in perfectly. Since we were in the midst of our birthday season, we made our candles into birthday cake candles. They ended up being about 2 1/2" with a small diameter. I love their homemade look...and, of course, the fact that they are made of pure beeswax, so I won't be hearing about them on the evening news!


It couldn't be simpler. First of all, we got out our fondue pot. (We never use this particular pot because I don't think it is designed with large families in mind.) I filled it partway with water that I had brought to a boil in a kettle. Next, I placed chopped beeswax into a cleaned tomato paste can, adding more as it melted down. I used this size of can because it was about the length I wanted our candles to be and it had a fairly small diameter. If you use too big a container, you will have to melt tons of beeswax to bring the height up. I covered a table with paper and placed the pot in the centre.

Next, I took a length of wick, twice the size I wanted the candles to be, plus a bit to hang over our homemade lincoln logs. I dipped the wick on both ends one time, letting it drip back into the can. As it started to cool, I pulled it out tight to straighten it, so that the candle would end up straight. If you just let the kids start dipping, the wick will be all wonky. After it had a minute to cool, we were ready to go. I hung the double wicks over the lincoln log and gave them to the kids.


Now, you can see that for our 4yodd, the two candles are sticking together. We found out that for the littlest ones, it seems better to just tie one wick at a time on the lincoln log (or use a pencil) because they have trouble holding the stick straight so that the candles hang down and don't touch. Anyway, we walked around in a circle, each taking a turn to dip our candle(s) as we got to a certain spot. This works well because if you dip the candle before the last layer has had a chance to cool a little, it will just melt the previous layer. Also, it is important to just dip in and out quickly, not let the candle linger in the wax, otherwise the candle will also melt. Some people like to repeat a little poem as they walk around the table. You will need to top up the wax as it is used up to keep up the height inside the can. At the end, you will have leftover wax inside the can. You can leave this to cool and then melt it from the can next time you want to use it, or you can make a few poured candles, if you have any molds. (I made a few homemade molds out of aluminum foil.)


Here they are, hanging to harden up before being cut apart to be used. I think they are very cute and I love their handmade look. We have had a couple of opportunities to use them already and will have several more before the year is over.